Connecting Storage
For New GRAX Installs and Changing Containers
There are a couple cases in which you need to connect GRAX to a longterm storage provider:
- New GRAX installations
- Changing storage credentials
- Moving to a different container/bucket/provider
Regardless of need, the storage configuration is always accessed the same way.
Data Loss and Corruption Possible
Never change your connected storage target in production without consulting with the GRAX support team. Changing the storage target after starting data backups risks corruption and/or loss of the entire dataset. For more information about how GRAX stores your data, see here.
Connecting to Supported Storage
The GRAX app currently supports S3, S3-compatible, Azure Blob, and GCP cloud storage containers. The Storage Settings module allows you to choose the desired platform and adjusts the input form to match.
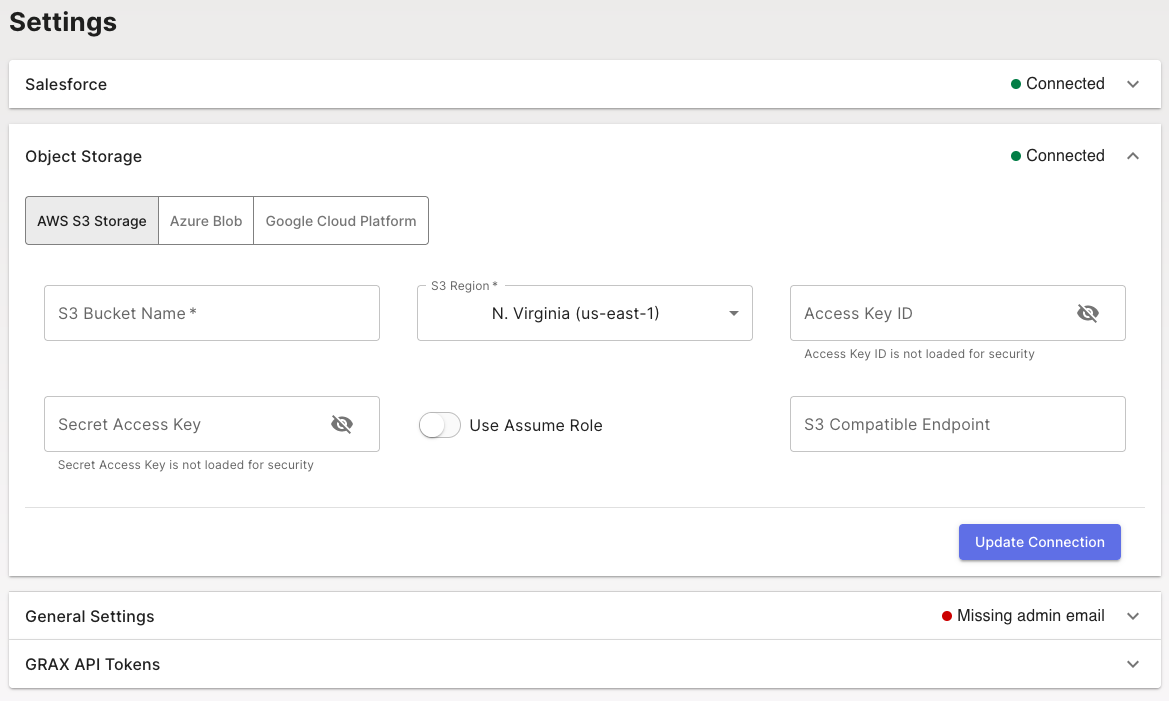
On AWS, GRAX supports the use of credential-less instance roles by entering no access key or secret via the configuration form. For all other configurations or providers, you'll need access to the storage credentials to fill and save the form. After saving, the app takes a minute or two to reboot and reconfigure.
Once successfully connected, the module has a green "connected" indicator.
Special Cases
Using EC2 Instance Role
EC2 instances are deployed with an assigned Instance Role. If your bucket and EC2 Instance/Role are located in the same AWS account, it's beneficial to use this Instance Role as the authentication method for S3 traffic. This allows you to authenticate GRAX with the bucket without a set of static IAM keys ever existing.
To connect to an S3 bucket via the Instance Role, fill in only the "Bucket Name" and "Bucket Region" fields of the storage configuration. The AWS SDK resolves the Instance Role credential provider and connects as long as the role has appropriate access.
Using AWS Assume Role
GRAX supports the use of AWS Assume Role for authentication into secondary accounts. This allows the S3 permissions to be managed in the account that owns the bucket and GRAX to be connected without static keys. The role or user that GRAX is authenticating with locally must be allowed to assume the remote role; this is managed in the account that owns the bucket and assumed role.
To configure the AWS resources for Assume Role with a GRAX Cloud app, follow the steps below. For self-managed deployments, the process is similar, but GRAX involvement isn't required.
-
Retrieve the AWS Account Number from GRAX.
Open a GRAX Support ticket explaining the intention to use Assume Role for a GRAX Cloud app. GRAX provides the AWS account number for the account that must be allowed to assume the IAM role you'll create in the next step. If you'd like to require an External ID for the Assume Role, include that request in this ticket. GRAX provides the External ID value that can be required in the trust policy.
-
In your AWS account, create the S3 Policy with the template below, replacing
{BUCKET_ARN}and{KMS_ARN}as needed. (AWS Documentation)NOTE: the KMS permissions and key mentioned in this template are only required if you plan to use KMS to encrypt S3 data differently than the default AES-256. (AWS Documentation)
{ "Version": "2012-10-17", "Statement": [ { "Action": [ "kms:Decrypt", "kms:DescribeKey", "kms:Encrypt", "kms:GenerateDataKey*", "kms:ReEncrypt*" ], "Resource": "{KMS_ARN}", "Effect": "Allow" }, { "Action": [ "s3:ListBucket" ], "Resource": "{BUCKET_ARN}", "Effect": "Allow" }, { "Action": [ "s3:DeleteObject", "s3:GetObject", "s3:PutObject" ], "Resource": "{BUCKET_ARN}/*", "Effect": "Allow" } ] } -
In your AWS account, create an IAM Role that trusts the provided AWS account number and attach the policy from the preceding step. (AWS Documentation)
-
Provide the ARN of the role you created in the previous step to GRAX Support. GRAX Engineering creates the necessary IAM resources to allow the application to assume that role.
-
Enter the "Bucket Name" and "Bucket Region" fields and enable "Use Assume Role" on the storage settings panel. Enter the remote role's ARN into the "Assume Role ARN" field, as well as an external ID if enabled during role creation.
Using Azure Private Endpoints
GRAX supports the use of Azure Private Endpoints for connections to Azure Storage Accounts and the containers within them. Private Endpoints enable applications to interact with storage resources without those resources being publicly available and without relying on consistent source IP addresses. This aligns with Azure's documented "Best Practices." Private Endpoint connections to resources within your account need to be requested from the subscription running the application and approved in the subscription which owns the bucket.
When a Private Endpoint is used to connect to a Storage Account, that Storage Account can be set to allow no traffic from any Virtual Network nor Azure's Trusted Services list if you so choose. This prevents all access other than the Private Endpoint, including access via the Azure Portal which may affect your end-users.
To configure the Azure resources for a Private Endpoint to a customer bucket on any GRAX-managed deployment, follow the steps below. For self-managed deployments, the process may involve creation/configuration of additional network resources such as a private DNS zone and supporting resource links.
-
Retrieve your target Storage Account ID from your Azure portal and send it to GRAX.
Opening the JSON view on the Storage Account's "Overview" page makes this easiest. Send this ID to GRAX Support along with identifying information for the environment you'd like to connect to that resource.
-
GRAX Engineering will modify the identified environment to include a Private Endpoint connection to the provided Storage Account ID.
-
Once the Private Endpoint is created, approve the connection in the subscription that owns the Storage Account. This is done by navigating to the "Private Endpoints" section of the Azure Portal and clicking "Approve" on the pending connection. The request message will identify GRAX-specific requests.
-
Once the Private Endpoint is approved, update your GRAX application's storage connection to use the new Storage Account name, Storage Container name, and access key. It may take up to 15 minutes for an approved connection to reach a stable state, so try the connection a few times over a 15 minute period before contacting GRAX Support if issues occur.
What's Next?
If you've made it here through installing GRAX and connecting to Salesforce, you're now all set to start backing up and harnessing your data. See Auto Backup documentation for more information on getting data backed up to GRAX.
Updated 8 days ago